Friday, August 29, 2014

Hanging Book Pocket – An Organizational Project

School is in session and since I only have two boys to entertain during the day, my project list is growing! There are so many things I would love to work on but organization is at the top of my list. I have been searching for the best way to store children’s books on a small budget. Bookcases are expensive and also a climbing temptation, plus we don’t have a lot of empty wall space in our living room. But I think I may have found my solution! 

While looking at ideas for car organization, I happened to come across a Pin for a book holder for the backseat and it inspired me to create this hanging book holder to use on our banister. So off I went into my craft closet to look for the supplies I needed.

1. I found the valance material I had removed from the windows of our house when we first moved in. (Having a minor hording problem has its benefits) It was finished at 12” and a nice sturdy cotton. I cut and hemmed it at 30” long.


2. For the main pockets I used the left over material from the storage boxes in my Laundry Room Makeover. I cut each panel a little wider than the backing so it would give room for more books. Each panel was approximately 10” x 14”.

3. I attached the panels to the backing with a simple top stitch (hopefully you can sew in a straight line, if not, you can make yours a little wavy like mine)


4. I made the ties by cutting four strips and sewing two edges closed on the wrong side

5. I used a pencil to assist in turning the ties to the right side. I ironed them flat and folded under the remaining raw edge

6. I attached two ties to each corner on the top of the backing material – since this was originally a curtain valance it had rod pockets on top and bottom, so I stuffed the ends of my ties into the pockets and sewed it with a zig-zag stitch for add strength

7. I ended up using four panels but the fourth one I made smaller to match the reveal size of each pocket, approximately 7.5” Next time I think I will make the panels a little shorter and possibly add more

After it was all done, I tied it on our banister and filled it with books. It is a nice simple solution to our storage problem. I think I need to make two or three more to hold all of the books we own but this is a great start. Total I spent approximately 2-3 hours on the project and ZERO dollars. Functional and Free. The best combination! 

I hope everyone has a safe and fun holiday weekend!
Until Next Time, 
Sonja


Friday, August 22, 2014

Stevia Select: Chocolate Raspberry Liquid Stevia Product Review

As most of you know I began a sugar free lifestyle back in March when I started Trim Healthy Mama, (affiliate) it has been life changing and I am loving it! (I will be sharing that journey with you soon!) When I started my search for sugar alternatives I had read that quality Stevia could be difficult to find. I stumbled upon Stevia Select while browsing Amazon.com and after reading all the positive reviews I thought I would give it a try.

I first ordered the 100% Pure Stevia Powder and was delighted to discover that not only did it taste great, it had none of the bitter after taste that I was warned about from other products. Since then I was able to be in contact with this family owned small business and I received a bottle of their Liquid Stevia in the Chocolate Raspberry flavor to review.
Stevia Selectpics
I was a little disenchanted at first since I normally do not like the blend of chocolate and fruit flavors (apart from the occasional chocolate covered strawberry). However, I was pleasantly surprised by this little bottle of Stevia. It has nice delicate raspberry flavor that isn't overwhelming.

I first tried it in a serving of plain Greek yogurt and it took about 10-12 drops to get to the sweetness level that I like but it blended in smooth and creamy. It left the best after taste, the kind that leaves you wanting just a little bit more.
Stevia Selectpics2
After that I used it in a cup of black coffee, and the warm drink really brought out the flavors. I didn't have to use as much, just 6-8 drops, and could really taste the fullness of the flavors better than in the yogurt. It was also just as yummy in a cup of hot Oolong tea {for those of you on THM: Chocolate Raspberry Shrinker! Yummy!} I discovered that, as the bottle states, it really does need a good shake between each use and the dropper works best when emptied completely after using to prevent clogging.

The real test was my beloved Chocolate Muffin in a Mug. I followed the recipe in the book and added 6-8 drops of the Chocolate Raspberry Liquid Stevia.
Stevia Selectpics3
Then I made a Chocolate Raspberry Whip to spread over my muffin. 
Because who doesn't love losing weight eating whip cream smothered chocolate muffins!?
I topped it with Skinny Chocolate chips and it was delicious! 
Stevia Selectpics4

I am very excited to have this product in my pantry and I cannot wait to try the other flavors Stevia Select has to offer.

Check out their website to learn more about this great company and order your Stevia today!

Until Next Time, 

Sonja


Friday, August 1, 2014

Magic Fingers: a shoe tying miracle.

My first born will be starting Kindergarten in a couple weeks. It is hard to believe how fast the past five years have gone. We are so very blessed by our wonderful boys. I have been watching videos of him when he was a baby and young toddler. Talk about setting myself up for emotional meltdowns! So I thought I'd better take a break and share this small miracle we experienced yesterday.

This summer has welcomed lots of new challenges, one being teaching the boys how to tie their own shoes. After weeks of working with him on the traditional, bunnies, holes, and trees method I gave up and searched for a new way. 

I stumbled upon this video and it was a miracle.


After taking a moment to master this technique myself I showed it to them and in less than 10 minutes my, soon to be, Kindergartener was tying his own shoes!! Miracles do happen!

Now the next day has come around and a nights sleep has caused some set backs and like everything else, it still takes practice to master this new skill but overall this method worked so well I had to share.

He is so proud of himself and I am very excited to find something that works especially since I will be teaching this lesson three more times (very soon as fast as time is flying by these days)!


Now back to watching home videos... bring on the tissues!

Until next time,
Sonja

Friday, July 11, 2014

WASH - BRUSH - FLUSH. A bathroom sign project

My boys are growing up! They are learning to do things all on their own. It is a fun and very messy time in our lives. While they are working on mastering the ins and outs of daily life this summer, like proper hand washing, teeth cleaning, and toilet etiquette, keeping my calm and a decent reign on the mess is my goal!

My oldest loves lists and charts (like his Momma) so I decided it would be the best way to help them remember the steps. After searching Pinterest and not finding what I was looking for, I decided to make my own and here's how it turned out:

For each sign, I found free clip art that went along with the instructions that I had already been introducing to the boys. My oldest helped design the layouts and colors. Getting them involved always helps captivate their interest. 

The frames I had previously purchased for $0.25/ea at a local resale shop. I had planned on painting them, but the boys were so excited they couldn't wait for that step. 

We discovered front and center was the best location for remembering to follow each chart so I didn't even bother hanging them up. For less than $1.00 we have beautiful bathroom signs that are great reminders to my boys on the proper steps required for bathroom success! They love the pursuit of independence and I love this fun and cute way of helping them learn!

Thanks for stopping by I hope you all are having a great summer!

Until Next Time,

Sonja


Thursday, May 15, 2014

What is your calling?

I have been blessed to be apart of a weekly women's Bible study group at our local church for over four years now. We have grown in love and in number over the years and I am so grateful for these wonderful women. They are truly a foundational part of my life and my walk with the Lord. 

We recently completed Esther: It's Tough Being a Woman, by Beth Moore. Wow, what a great study! The detailed look into the life of Esther was inspiring and encouraging. Over the past weeks we have learned about our beauty and destiny in the Lord. And our worth and value as daughters of The King. We ended the session answering the questions: "What is your calling?" and "How do you know?"

When it came my turn to answer my first response is the obvious one: Raising Little Men! And as we dedicated the babies to the Lord this past Mother's Day, we publicly committed to that calling. To be the Primary Faith Influence in our children's lives. This is my greatest calling at this season in my life. To be a stay at home mom and raise my boys in the faith and trust of a loving God who desires great things for us. Along with that I am learning my secondary calling is to share my journey with others.

When I started this blog I felt the gentle push from that place deep inside. If you learn to listen you will know it is the Holy Spirit speaking to you. The voice you often answer with "I'm not qualified to do that!" but gradually (or sometimes, all of the sudden) it is there, these ideas, this thought, this purpose, this calling. It is often bigger than you, it is going to take more than you have to offer. But it is going to be glorious, because it is going to be God working through his child in a beautiful partnership.

We can't fulfill this on our own, but as we learned through Esther, it's is not our job to figure out the "how" it is our job to do the "What" and let God take care of the rest.

So what is your calling? What is that thing that you keep thinking about? What is your purpose? Do you know? Have you felt that push from the quiet places of your soul? It's okay if you don't feel qualified, it probably means it is exactly the right thing. God is calling you into your destiny!

Until Next Time, 
Sonja

Thursday, February 20, 2014

Chevron Crochet Baby Blanket

Chevron Crochet Baby Blanket

Hello! It has been a busy few months for me and our family. Along with the holidays, we welcomed our fourth sweet baby boy into this world and celebrated our oldest turning Five. We have been adjusting to having two babies (our third child is 15 months old) in the house again (our first two boys are also 14 months apart - yes, it was planned and yes I might be crazy! :-D) but we are loving every minute! 

Despite being very pregnant and busy with my three boys, I was able to complete my baby blanket project in time for baby's arrival in January. And now I am finally getting a moment to share it with you! 


I have an afghan that my grandmother made when my father was a boy and I love it and so it became the inspiration for my baby blanket.  I used this pattern as a reference but as you can see I did not fill in the points. I also crocheted into the back loop only to create the rippled texture. It was fairly easy as long as you check your work to make sure your stitch count is correct. I love how it turned out!

Yarn:

Caron Simply Soft 3.5oz
Colors: (2) Ocean, Pumpkin, Heather Grey

Hook:

H/8/5mm

Pattern:

Chain 151 stitches.

Skip 1 chain from hook, *SC in next 11 stitches, 3 SC in the next stitch, 1 SC in next 11 stitches, SK 2 stitches.  Repeat from* until the last SK 2 stitches.  Instead, Skip 1, 1 SC, CH 1 and turn.

I made 8 rows of Ocean, 4 rows of Pumpkin and 2 rows of Heather Grey, with a SC Grey border.

Finished Size: 26 x 32


Thanks for stopping by! I hope to be posting more often but as you can imagine I have my hands full most hours of the day (and some of the night) so until next time, enjoy something creative! 

- Sonja

Monday, October 28, 2013

$30 Laundry Room Makeover


I have long desired to give my plain white laundry room some personality and the faster my due date approaches the more motivation I have to get some projects done around the house (Some call this nesting, but I like to call it necessity.) Like always, budget is a concern so I was waiting for some of my Facebook Swap Shop items to sell for the extra cash to dive into this project. Thankfully some sales went through and I had about $30 to spend on this project. Set with a gallon of paint (which at $21, was the bulk of my spending) and several Pins on Pinterest I got started! I haven't completely finished since I have not decided on my laundry sorters (although I'm not sure I will ever really be "done") and I kept waiting to take pictures until all the laundry was done, but since that NEVER happens, you'll get to see the best of real life. :)

$30 LAUNDRY ROOM MAKEOVER
Paint Color: Walmart's Color Place Spiced Paprika (Semi-Gloss)
Stain Color: Minwax Dark Walnut
(For more information on the Pins I found my inspiration from check out my Laundry Room Makeover Board on Pinterest)

My laundry room not only is the place where all the dirty clothes are supposed to end up, it also serves as the diaper changing station and closet for the little baby clothes. Along with all the other cleaning supplies, vacuum, etc. Some day after diapers, and babies sleeping in our room, I will love turn that space into my craft and sewing station but for now it is filled with diapers, wipes, and lots of little socks! As you can see it was all white and completely uninspired. I had previously organized the baby items in the cabinets using wipes boxes and it made a huge difference in the ease of finding what I happen to be searching for at the time.

I will have to note that I did not enjoy the Walmart paint, although this was my first time using a semi-gloss on a large scale, I believe the quality was lacking, but for this space it worked out even though a higher quality paint would have made this project go a little faster. However, I do LOVE the color and even without anything else it makes the space.
  
My favorite change (besides the color) is the new light fixture. I absolutely despise fluorescent lighting and the big rectangle blaring light was awful! Not only was it just plain ugly, it would flicker and strobe and half the time not come on at all. So I went to our local Habitat for Humanity Restore and found "new" fixture that happened to be an exact match to the one in our entry way for only $5! Complete with working blubs! The change made me so happy I cried (literally; these pregnant hormones are hard to control!)
This LAUNDRY sign is one of the Pinterest inspired portions of my makeover. I made it from a scrap piece of wood we had laying around and I printed the letters on paper and transferred the image to the wood, then used my Drimel to engrave it. I painted the letters with black craft paint and stained it with Minwax Black Walnut.


The three bins are diaper boxes (Size 5 Parent's Choice) I covered in fabric that I also found at the Restore for less than $1 a yard.


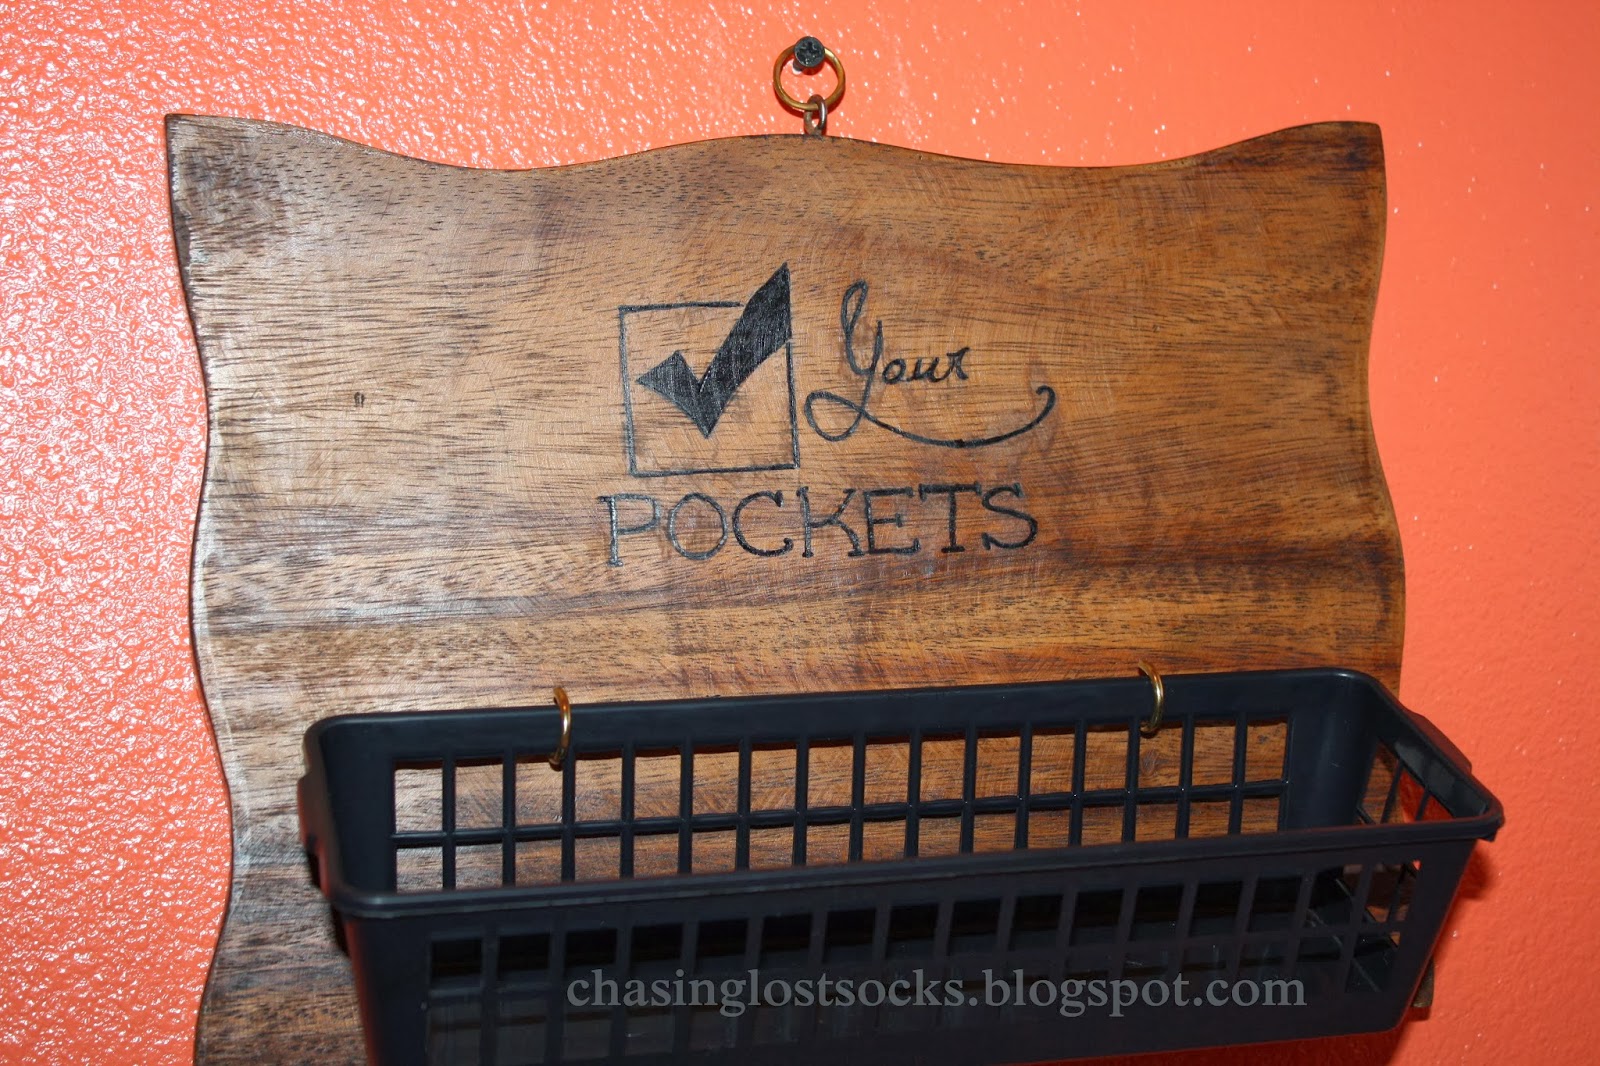
I also found this solid wood sign at the Restore for $1 (it has some quote about sailing engraved on the reverse side)  I loved the shape and it was the perfect size to make my 'Check Your Pockets' sign. All I had to do was transfer the image using the same process I used for my laundry sign and this time since the font was smaller I decided not to engrave it but just used a black Sharpie to darken the transfer and then brushed a coat of stain over it all to freshen it up.  


Of all my Pinterest finds I think this sign defines my life with laundry the best! I saw this quote and knew it was perfect for our laundry room. It took me a while to decide on the art work to accompany it but I found these super cute vintage prints and loved the bright colors.  The hanging rack was a garage sale find from last summer that was waiting to find it's perfect home. I stained it to match the rest of the wood items throughout the space.


 Overall I am so pleased with how it turned out. Remember it only takes a few bucks and a little motivation to brighten the most humdrum areas in your life! 

Until Next Time, 
Sonja